Every time you play around with Brush settings and like the brush so much that you want to save the brush. Do it before you shut down photoshop or you will lose these settings.
Here is how:
Every time you play around with Brush settings and like the brush so much that you want to save the brush. Do it before you shut down photoshop or you will lose these settings.
Here is how:
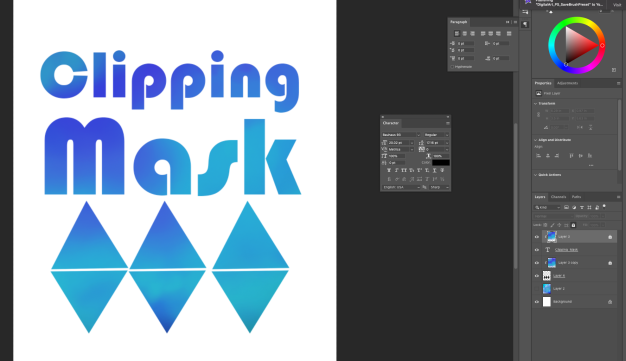
If you remember from our Illustrator discussions, Clipping Masks helped us “cut out” patterns to match our packaging. Think of this as we make Clipping Masks in Photoshop. This of this as a stencil.
Option + click in between layers
Making custom brushes is so much fun. I learned how to do this from a concept artist named David Levy and it is amazing. As you start to creatively think, you can make anything you want from custom brushes. Today we will make a cloud brush.
Edit – Define Brush Preset
In this Class Exercise we will take something we will learn about basic and advanced brush settings. The Brush Tool is one of my favorite tools because you can tailor each brush to do one thing really well. Let’s talk about some basics and then I want you to explore Brush settings.
Hardness
Opacity
Spacing
Angle
Jitter
Scatter
Christian noticed an issue with some of his cropped images. In this video I cover what you might have noticed with some of your cropped images. Please watch. Image Size is probably one of the most important menu options available as it has a lot of important information.
We will apply our first Adjustment Layer of both Gradient Map and Threshold. This is the primary ways we will create a Grayscale composition for Project 3.
Remember that Gradient Maps will allow for a refined grayscale image while Threshold will convert all of the value in a scan into either black or white only. Below is an example of a Threshold Adjustment Layer being used.


The Layer Mask is your first introduction to working “non-destructively”. Masking will assist you in covering up or revealing pixels all the while keeping every pixel intact. You are not deleting, you are simply covering up or revealing. Since this works in grayscale, we will explore its use with black, white, gray and gradients.
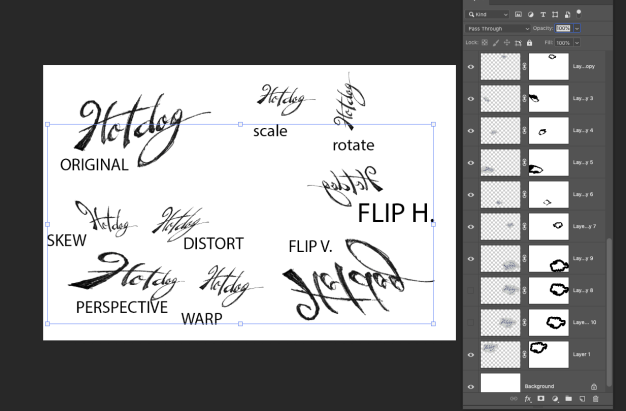
(You should already know: I recommend to always have “Transform Controls” checked when moving part of your image. Doing so will help you see what you moving, rotating, or scaling. In this class exercise, we will perfect our skills with this option for the Move Tool on.)


Distorting and Transforming objects can also be used in your work. As you continue to work on Project 3, explore how moving beyond scaling and rotation can add dynamism and drama to your composition.
The menu option Edit-Transform is an extension for using Transform controls.
**You need to RASTERIZE TYPE before you have access to all the transformation tools.
**You can quickly access distort from the MOVE TOOL by pressing the COMMAND, click and drag a corner. See what happens.
**If you don’t like a transformation, press ESC key.
**Pressing ALT/OPT while scaling, scales from the center outward.

Filling type with a single color is good, but use type forms to your advantage and fill them with pictures. In this exercise we will use our CMD+left click action to create a selection and then copy and paste from patterned pictures.
Examples.


real world examples:


What goes on inside that head of yours? Use hand-drawn illustrations to accompany your portrait. This portrait should be about things that interest you, things that run around in your head or things that occupy your mind on a daily basis. Incorporate your hand-drawings to become apart of your head. Be creative! Explore placement, scale and dissection.
Use all of your Photoshop talents that you have learned so far. Final image must be in Black and White.
You need to take a recent photo of yourself! These cannot be simply any image from Social Media. Your phone may take an image that can be used depending on many factors. I want to see the image you are using.
Watch and check back as more Demos will show my process in the coming days. Be patient as we still have more to learn. You will be completing CE’s concurrently. These CE’s will help you work faster, so please put them into memory.
I am introducing this now, so you can start completing all the drawing tasks now and get to the compositing later in Photoshop.
Create a composition using only hand-drawn sketches and a photograph of yourself. No other photos are allowed.
The final submission in G-Drive must be in Black and White (grayscale). 18×24″ at 300 ppi. PSD file!


